
Like you, a lot of people curious about the system IDLE process. Every user needs fast computing. They want as soon they click it should work. Bye, the way, sometimes it did work according to our expectations. There are a lot of factors involve in this cause of slowness. It may cause malware function, or maybe your hard drive is full, not optimized. Too many unnecessary startup programs also can be a reason to become slow of your PC.
If someone has a little knowledge about Task Manager and then whenever they see that system idle process has taken 98 or 99%, they worried. I am telling you there is nothing to worry about it. It is a natural process, and we will solve it step by step below. After reading this article till the end, your PC will become fast as it is a new one. So, stay with us and follow the guidelines.
Table of Contents
What is System IDLE Process and Why It Is Taking So Much CPU?
Have you ever had a chance to see the task manager? If you have or not, there is an option to look Details, and here you will get the system idle process. It just an idling process made by the operating system (OS). You can say it is software the is running when the computer has nothing to do. Your system can potentially freeze without this process because it is continuously keeping your processor busy with something to do.
Now let’s talk about the percentage you see in your system. Usually, the system idle process show usages like 98% or 99%, or even more or less. Don’t be panic. If you see like this, it is just saying you that hey I only used 2% or 1% of your CPU. I have not taken what you see, like 99%. It is the rest of the capacity you have. The high percentage indicates that a large amount of processor power in being unused.
However, if your PC is still running low, it is a problem, but you cannot blame the 99% factor for that. It may be something wrong with the background process; it can be backdated driver software, unnecessary third-party application startup, or any virus malware infection. By the way, the process of fixing we will talk later below.
The primary reasons for the System IDLE Process, causing Computer slowness:
- Unnecessary startup programs running in the background all the time.
- Unwanted program or software installed on the system.
- The hard drive is full or not optimized.
- Extra Anti-virus installed on PC.
- Virus or Malware attack.
- Corrupt of the faulty device driver and so on.
Should I stop working System IDLE Process?
The answer is No. You cannot only stop it. And you should not stop it. It is just an idling process which is running by the operating system when your computer has nothing better to do. Your computer will stop working without this process, and the system could potentially freeze.
So, the matter is if anything is true about above mentioned primary reasons then chances are you are surly facing the high CPU usage by system idle process. However, we will not have to worry as without wasting time, we will fix the issue with the help of the below-listed guidelines.
Method 1: Disable unnecessary startup apps and services
As soon as you start up your computer, some apps and services start running in the background. Some are unnecessary. For these startups, you experience high system resources usage by windows OS. So, you should disable these apps and services to run windows smoothly. Please follow the steps below.
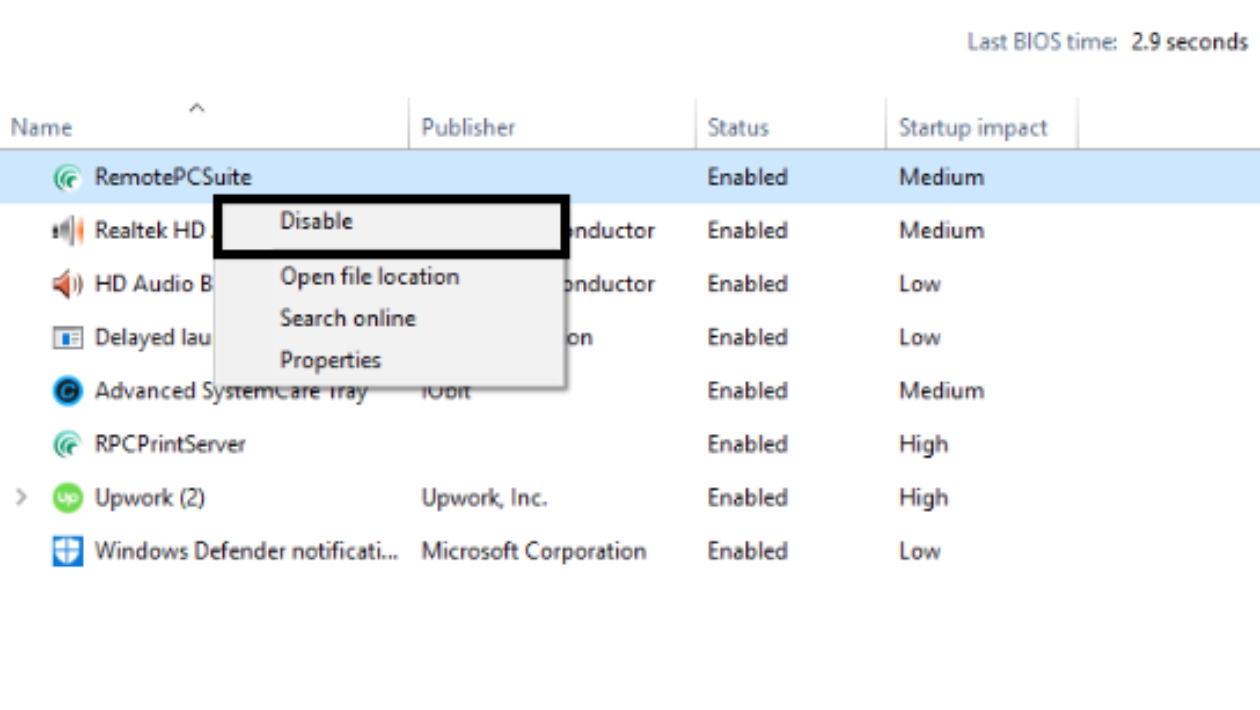
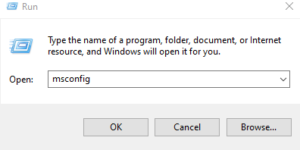
Step 1. Press Windows + R, then input msconfig and then hit Enter or click OK.
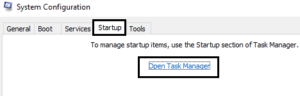
Step 2. Choose the Startup tab and then click the Open Task Manager link below.
Step 3. Click the right button mouse on unnecessary startup apps and click Disable.
Step 4. Repeat the process for all the unnecessary items you do not want to start.
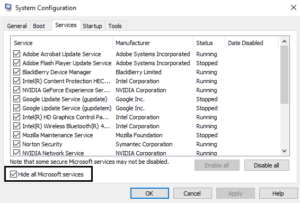
Step 5. Again, go to the msconfig window and now switch to the Service tab and then check the box below “Hide all Microsoft services.”
Step 6. Click on Disable All button and finally click on OK.
Step 7. Now restart windows and check whether high CPU usage by system idle process issue solved or not.
Method 2: Make It Sure, Windows Have Latest Drivers Installed. If not, follow the guidelines below to update.
Drivers make windows running your hardware. Drivers are critical factors for running operating systems. They drive; that is why they are called a driver. If your specific driver is backdated, faulty, corrupted, or incompatible with the Windows operating system, then there might be a happening memory leak. A memory leak occurs in high CPU as well as high memory usage.
You do not need to worry. There are some solutions for them. Run an automatic driver update, or you can update the drivers to the latest one available to check whether faulty drivers cause it. Install the latest drivers for recently installed hardware devices, and if there is no hardware, then make sure you have the latest drivers listed below.
- Video Card.
- Removal or External Disk Drive.
- Network Card or Router if you have.
For checking manually and updating the drivers follow the steps:

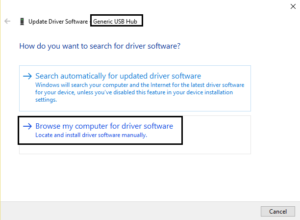
Step 1. Press Windows key + R, type devgmgt.msc and then Enter to open the Device Manager.
Then you will get this window,
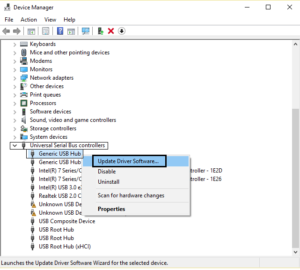
Step 2. Expand the Universal Serial Bus controllers.
Step 3. Click the right button on the mouse on Generic USB Hub and Choose “Update Driver Software.”
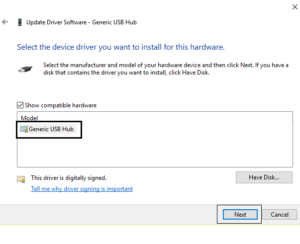
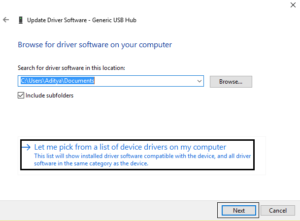
Step 4. Now choose the link “Browse my computer for driver software.”
Step 5. Press on the link, “Let me pick from a list of my device drivers on my computer.”
Step 6. From the list of drivers, select Generic USB Hub and then click Next below.
Step 7. Please sometimes wait for windows to finish the installation. After installation, click Close.
Step 8. If the problem still showing, there is one thing more to do. Follow the steps, as mentioned earlier, for all the devices listed on Universal Serial Bus controllers.
I hope these methods will resolve your issues if not visit devise manufacturer site, and locate the latest available driver, install on your PC. Restart your PC to make changes.
Method 3: Disabling Windows services named SuperFetch.
Some Windows 10 services cause problems. Sometimes they are the main culprit to take up your CPU resources. There is a service called “Superfetch” in Windows 10, which sometimes access most of the data available form RAM. If you somehow disable the service by the below instructions, you will notice a massive decrease in CPU usage.
Step 1. Open Windows + R, input services.msc and then hit OK.
Step 2. Look for the service showed “Superfetch.”
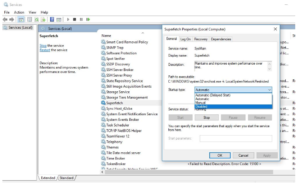
Step 3. Click the right button on the service and select “Properties.”
Step 4. Disable it, and then stop the service.
Step 5. Finally, Click Apply and hit OK to complete the changes.
N: B: There are other kind services named Background Intelligent Transfer Service, Windows Search, and Windows update service. They are also killing CPU usage and do the same process for them.
Method 4: Adjust Windows 10 for Best Performance.
Sometimes you had to adjust with your life too. So why not with your computer for better performance. System IDLE Process may significantly affect the performance of your computer, and there is no doubt. And here you have to adjust it on your own.
Just follow the steps below.
Step 1: Open the Control Panel.
Step 2. Search “Performance” on the top of the control panel.
Step 3. Select to Adjust the appearance and performance of Windows.
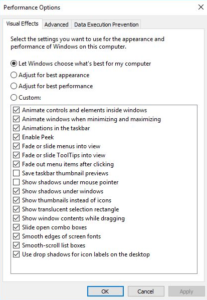
Step 4. From the Performance Options, Select Virtual Effects.
Step 5. Check the box for Adjust for best performance and then hit the OK button below.
Method 5: Run Disk Cleanup.
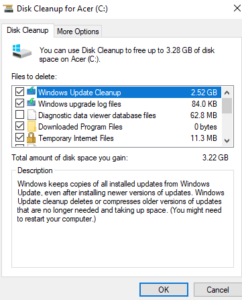
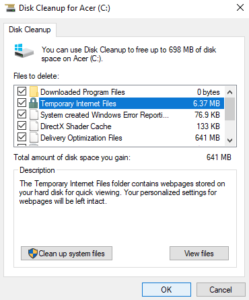
Disk cleanup is the way that will free up some spaces from your hard disk. It may not delete enough, but it will give you some space to breathe. And it will also fasten your PC performance as well as help to high CPU usage on the system idle process. The way we are talking about is Disk Cleanup. Although many users do not care about that, it can delete up to 5-0 GB of space form your hard disk. By the way, do not worry. It will not delete your necessary files. Disk cleanup usually deletes temporary files, empties recycle bin, System Files, removes all the unnecessary files that you do not want.
Anyway, without wasting time, can we see to run the disk cleanup and make a faster out PC? Let’s do it.
Disk Cleanup in Windows 10
Step 1. Press Windows Key + R, input cleanmgr, and hit Enter.
Step 2. You may have more than one disk on your system, then you need to select individually, but it is generally C: drive and Click OK.
Now you follow the methods listed below to clean up the disk.
Free up for only your account.
After step 2, check or uncheck the items you want to delete in disk clean up.
Next, Click, OK. And wait before Disk Cleanup is complete it’s operation.
Clean up system files.
Type the Disk Cleanup in the Search box then clicks on the result.
Next, select the drive you want to free up.
Once selected your drive, click on “Clean up system files” below.
It may prompt by UAC, then select Yes then choose C again: drive and click OK
Now finally, check and uncheck items you want and then hit OK.
We will show one more method, but now let’s check our system idle process that it still high CPU usage or not. And what is about our PC performance. I hope it is fast than before.
Method 6: Disabling Windows 10 Tips and Tricks Notifications.
The notification system also may cause slowness issues. By disabling this function, you may forward one step to solve the system idle process issue. It might be one of the reasons for high CPU usage.
Follow these steps to disable Windows 10 tips:
- First of all, Press Windows key + I, then Windows Settings will open.
- Secondly, Click on the system and then Notifications and Actions.
- Finally, turn off the toggle that shows “Show me tips about Windows.”
I hope this works how you want.
Method 7: Make sure the anti-virus program may troubling the issue of the system idle process.
A lot of users using third-party anti-virus and maybe you are one of them. Sometimes an anti-virus causes the issue of high CPU usage. This may be generated for unforeseen background scans as it is continuously scanning time to time and thus creating your system slowing down.
I have a solution for you to resolve the inconvenience. You need to go to the setting of your anti-virus and choose a schedule for running the scan. Choose a time when you are free and do not have important anything. This may prevent the issue of high CPU usage.
Method 8: Fix Corrupted system files.
Corrupted system files are one of the culprits that may cause the CPU and Memory Leak. It is glad to hear that Windows has an inbuilt system file checker tool. By this tool, you can scan the system for any unwanted corruptions manually and returning your PC system to a better working state.
Follow the procedures below, step by step:
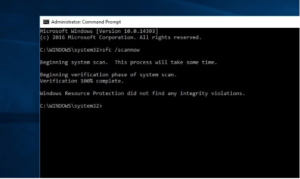
- First of all, click Start and then type cmd in the search box.
- Right-click Command Prompt
- Run as administrator.
- You will promote for an administrator password or confirmation.
- Type password, and then click allow.
When the command prompt, type the command below and then press Enter:
sfc /scannow
This above process of sfc /scannow command will scan all your protected files, and then replace all the corrupted files with a cached copy that is located at the folder %WinDir%System32dllache.
You should not close the command prompt until the verification is 100% done. This will take a little time to complete.