The image taken of whatever is on your screen is known as a screenshot. You can take a screenshot of any device you use. But we will focus on learning how to screenshot on the laptop, whether macOS or Windows.
Table of Contents
How to ScreenShot on Laptop In Windows 10
You have the option of taking a screenshot on any platform, and in Windows, it is also the same. It has many built-in choices that make our tasks easy, but many third-party apps offer more features.
Take a Quick ScreenShot with Print Screen (PrtScn)
There is a Print Screen button on the keyboard that allows you to take a screenshot and then save it as a file. However, you also have the option of taking a screenshot without saving it or taking a screenshot of only one window. You will find this button labeled as “PrtScn,” “PrntScrn,” or “PrntScrn.”
- To Save The ScreenShot as a File
If you are using the laptop, then press Windows Logo Key + PrtScn, and if you are using a tablet, then by pressing the Windows Logo button + Volume Down Button, you can take a screenshot. As soon as you do this, the screen will faint for a moment, and the screenshot will appear in a file and be saved under the Pictures > Screenshots folder. It will be renamed automatically as a number.
- To Take a Screenshot Without Saving
By simply pressing the “PrtScn” key, a screenshot is just copied to the clipboard of your laptop. Now you can paste this image anywhere you want, whether image editor or a word processor. However, the resolution of the image will be the same as desktop dimensions.
- To Take a Screenshot Of Only One Window
Press the title bar of the Window you wish to capture. By simply pressing the “Alt + PrtScn” button, the screen of the current Window will be charged and copied to the clipboard as the previous one. Now it’s your choice where you want to paste the picture.
How to Screenshot On Laptop (Only a part of the screen)
If you want to take a screenshot of any particular part of the Window, you can do this by simply pressing “Windows + Shift +S.” The whole screen will turn out grey, and the mouse pointer will also change. Now drag on the selected part you want to capture and then release the mouse pointer. The amount of the screen will be copied to your clipboard. Now you have the option of saving it anywhere you wish.
How to Screenshot on Laptop in macOS
The screenshots will always be an appropriate tool. It can be used in guiding someone through the new app, capturing any vital messages, or taking photos while talking on video calls. But sadly, Apple laptops or computers do not have any Print Screen key like in Windows software.
In Mac, we have different options to take the screenshot of any screen, any window, or any specific part of the screen.
Using Keyboard Shortcuts
The commands in macOS keyboards for taking screenshots are the easiest and quickest ways. It does not matter if you want to capture the whole screen or just the portion of the screen; macOS provides the best possible combination. However, by default, Apple saves our screenshot to the desktop.
How to capture the full screen?
There are two different methods for capturing the entire screen-
- By pressing the combination of Command + Shift + 3 keys simultaneously, we can capture the photo to our desktop.
- By pressing the combination of Command + Shift + 3 + Control keys simultaneously, we can capture and save the image to the clipboard.
How to capture any selected area?
There are also two different methods for capturing any selected part-
- By pressing the combination of Shift + Command + 4 and then dragging the cursor to outline the area, we can select the part of the screen we want to capture.
- By pressing the combination of Command + Shift + Control keys simultaneously and then clicking and dragging the particular region that we want to capture, saves the screenshot to the clipboard.
How to capture a single window?
- To convert first the pointer into a crosshair, press the combination of Command + Shift + 4 keys simultaneously.
- The second step is to press the Spacebar tab. This converts the pointer into a camera icon.
- Now when you will hover over any window that area will get highlights in blue. When you will click the Window that you want to capture, it will be saved to your desktop.
However, this method does not capture the windows but by using this method you can save the desktop, the menu bar, or the Dock.
The image which will be saved will consist of the Window and also its shadow in a PNG file. However, by pressing the Option key or Alt the shadow of the image will not be saved.
There is another simple method by pressing the Command + a Shift + 4 + Control key simultaneously saves the image to your clipboard.
Using the on-screen Marquee
If you are a user of macOS Mojave or later versions, then you have an option to load an on-screen marquee and also you can change the size or position of the image. It has various capture tools, different options for saving, and much more.
- If you want to save the resulting image to your desktop or any other location then press the Command + Shift + 5 keys simultaneously and then select the part whether the full screen or any specific part.
- And if you want to save the final image to the clipboard, then press the Command + Shift + 5 + Control keys simultaneously and then select the final shot. It can be full screen, any specific window, or any defined portion.
Now if you have a MacBook Pro with Touch Bar then you have multiple options like Selected Portion, Window, or Entire Screen. With this, you have the chance of saving the screenshots to different places such as Desktop, Documents, or the Clipboard.
The other advantage of the Touch Bar display is that you have the option of taking the screenshot by simply pressing Shift + Command + 6 simultaneously.
Capturing the screenshots with Grab
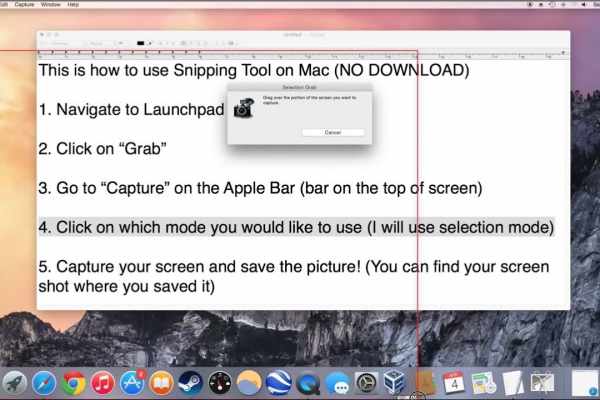
If you don’t like to remember all the shortcut keys of keyboards for capturing the screenshots, then there is another option for you. You can take the help of Grab. It is an app probably present on all the MacBooks which allows you to take screenshots directly from the menu bar. It also has a feature that allows you to take time-delayed screenshots.
But if you are the user of MacOs Catalina then Grab is not present in your software. Instead, you can use its feature by pressing the Command + Shift + 5 key simultaneously.
- Firstly open Finder and then click on Applications on the left.
- Then you have to double-click on the Utility folder and finally select Grab.
- Now you have two options whether you choose the Capture menu system to take the screenshots or use the shortcuts from the keyboard with respective commands.
How to take timed screenshots
With the help of Grab, you can take the photo of any section of the screen, or any particular window or the entire screen. Here is another functionality of Grab that allows you 10 seconds before actually capturing the screen.
It simply means if you want to open a menu or place the mouse pointer in any position then you have enough time to do so.
- To open Grab, follow the above instructions.
- When it is launched, and then selects the Timed Screenshot menu from the Grab menu. You may also press this combination Command + Shift + Z.
The one thing to keep in mind is that the mouse pointer will not be there in the captured image by default. However, to do so you have to click Preferences from the Grab menu and then choose the printer icon from the updated Window.
The pointer is only shown when you take any time delayed screenshots. It will not be shown if you are using keyboard shortcut methods. But on the other hand, if you don’t want to remember anything then Grab is the best option.
How to take screenshots using Preview?
Preview is another tool that allows opening anything whether photos or any PDF files.
- First of all, you have to open Finder and then click on Applications on the left side of the Window.
- Then you have to double-click on the Preview icon for the app to be opened.
- After opening, select File on the menu bar.
- When the drop-down menu occurs, click on Take Screenshot and then click on From Selection, From Window, or from the entire screen depending upon which type of screenshot you want.
How To Screenshot On Laptop (Frequently Asked Questions)
- How to screenshot on laptop on Windows?
To take a screenshot of any particular window, simply click on a title bar you want to take a screenshot. Then by pressing “Alt + PrtScn”, the screenshot will be taken and copied to the clipboard of your laptop.
- How to screenshot on laptop on Windows 10?
To take the screenshot of the entire screen on Windows 10, simply press the Windows key + Print Screen Key. The laptop screen will be dimmed for a second and the screenshot will be captured. It will be saved in the Pictures > Screenshots folder.
-
How to screenshot on laptop on Windows 7?
To take the screenshot on Windows 7, you have to first open Snipping tools. Then hold the Esc button and open the menu to capture. Then press Ctrl + Print Screen. Now click the arrow, which is just beside the New option, and finally select Rectangular Window or full screen.
- How to screenshot on laptop HP?
To capture the screen on your HP laptop, simply press the PrtScn button present on your keyword. This will take the screenshot of the whole screen and save it to the clipboard. You can then paste the picture either on any image editor or word.
- How to get the Snipping Tool?
First, click on the start button and type Snipping tools on the start menu and then select the snipping tools options from there. Then select the mode in which you want to snip the screen.
- How to capture a screenshot on Android?
For capturing the screenshot on android mobile or a tablet, hold down the power button and the volume key simultaneously. Hold these buttons until you hear the click sound or the sound of capturing. After doing this you will receive a notification on your device that your screenshot was captured and you now share it or delete it.
- How to add a snipping tool to the desktop?
For adding the snipping tool to the desktop, you have to click the magnifying glass on the left corner of the screen after which the search menu will open. After that, right-click on the snipping tool option and select “pin to taskbar” option.
How to capture a screenshot without a print screen button?
For taking the screenshot without a print screen button, first press the Windows button to open up a start menu. Then type “on-screen keyboard” and click on it. The on-screen keyboard will appear on your screen. Then click the on-screen button to capture and image. The screenshot will be then copied to the clipboard and you can paste it accordingly wherever you want.
- How to find the Print Screen button on HP Elitebook?
The print screen button is mostly located on the top right side of the keyboard. It is either written as PrtScn or PrtSC. Through this button, you can easily capture the screenshot on your HP Elitebook.
- How to take a screenshot on a PC?
In most of the android devices, you can capture the screenshot by pressing down the power button and the volume button for 1-2 seconds. However, in some mobile, you can press the power and home buttons together while some have the feature of directly pulling down the quick settings menu.


